wml52
New member
OK so here is my variation on the HUMVEE cold air intake theme. Now I just want to state that this mod was not an effort to fabricate a snorkel, but rather a way to get cooler air into the intake, although I suppose you could use it as a snorkel if you extended the intake tube. However I’ve been wheeling for many years and have never had to cross water so deep that I had to use a snorkel.
Most of the credit should go to Frank Steven Taldone a.k.a. “Kerndone” he has an excellent write up on this mod posted on JeepForum.Com Write-up for a Hummer cold air intake - JeepForum.com.
The major differences between Franks mod and mine was the use of the Spectra Performance intake kit p/n 9943 instead of the Buick air box and the way I chose to modify the HVAC intake cover underneath the cowl.
The reason I used the Spectra Performance kit was that I got a really good deal on it ($50.00) otherwise the Buick air box would work just fine. I also chose to modify the existing HVAC intake cover a little differently and chose to fabricate a custom intake duct instead of the method used in the write-up. The reason for this was, in looking at the photos of the HVAC intake cover he had to cut away and cover a large portion of the HVAC intake area to allow for the fitment of the 3” diameter hose that connects to the toilet flange. I thought this would significantly reduce the amount of air (cfm) flowing through the HVAC intake adversely affecting the HVAC system.
In order to minimize the HVAC intake restriction and maximizing cfm flow rate to the cold air intake I took a few clearance measurements and made a cardboard template of the duct I wanted to fabricate. Since the Spectra intake was based on a 3” diameter tube that equates to approximately 7.0 square inches. I based my template on a duct that would give me approximately 7 square inches, which worked out to be a duct 5”x 1.5” or as close to those dimensions that available space would allow. As Frank stated it’s a very tight fit! It took a little bit of tweaking to get all the dimensions right for a proper fit and as you can see in the photo it’s not a perfect 5” x 1.5” but the shape and size does not seem to affect the cfm flow all that much.
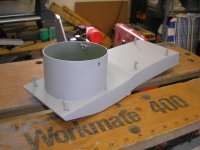
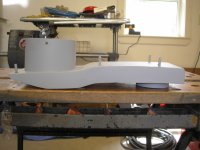
The intake duct was fabricated from 16ga steel that I had lying around my garage, one 4.5” and one 3” exhaust pipe that I picked up at a local supplier, I also welded in place six 10-24 screws so I could mount the duct to the underside of the cowling. Once I welded all the seams I had limited access to the interior of the duct so I used Eastwood’s Internal Frame coating (p/n: 12511Z) to coat the interior of the duct to prevent any rust from forming on the inside. The outside was primed and painted using Eastwood’s Extreme Chassis Black Satin (p/n: 11175Z)
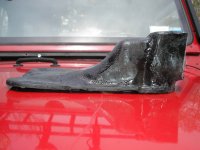
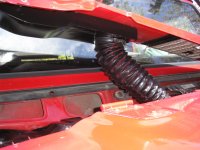
As you can see in the photos I also had to modify the HVAC cover to allow clearance for the intake duct to sit just above it and minimize flow restriction into the HVAC intake, it was just a matter of cutting away some portions of the plastic cover and laying on some fiberglass to the shape I wanted. It’s a close fit but it works quite well.
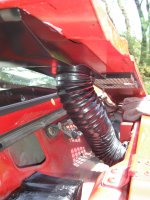
The intake duct is held in place using the six 10-24 screws and some #10 flat washers and #10 acorn nuts. The HUMVEE cap is held in place using three #10 security screws. I opted for the security screws to prevent anyone from tying to borrow the cap. Once everything was mounted in place it was just a matter of attaching the 3” tube from the intake duct to the 3” mounting flange that comes with the Spectra Performance kit, replacing the cowling and buttoning everything up.
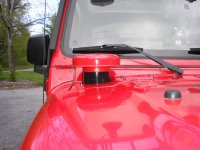
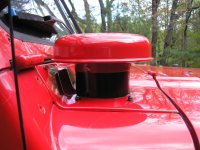
All in all it took several hours over a couple of weekends to fabricate, fit and mount everything but I think it was well worth the effort. Your comments are welcomed.
Most of the credit should go to Frank Steven Taldone a.k.a. “Kerndone” he has an excellent write up on this mod posted on JeepForum.Com Write-up for a Hummer cold air intake - JeepForum.com.
The major differences between Franks mod and mine was the use of the Spectra Performance intake kit p/n 9943 instead of the Buick air box and the way I chose to modify the HVAC intake cover underneath the cowl.
The reason I used the Spectra Performance kit was that I got a really good deal on it ($50.00) otherwise the Buick air box would work just fine. I also chose to modify the existing HVAC intake cover a little differently and chose to fabricate a custom intake duct instead of the method used in the write-up. The reason for this was, in looking at the photos of the HVAC intake cover he had to cut away and cover a large portion of the HVAC intake area to allow for the fitment of the 3” diameter hose that connects to the toilet flange. I thought this would significantly reduce the amount of air (cfm) flowing through the HVAC intake adversely affecting the HVAC system.
In order to minimize the HVAC intake restriction and maximizing cfm flow rate to the cold air intake I took a few clearance measurements and made a cardboard template of the duct I wanted to fabricate. Since the Spectra intake was based on a 3” diameter tube that equates to approximately 7.0 square inches. I based my template on a duct that would give me approximately 7 square inches, which worked out to be a duct 5”x 1.5” or as close to those dimensions that available space would allow. As Frank stated it’s a very tight fit! It took a little bit of tweaking to get all the dimensions right for a proper fit and as you can see in the photo it’s not a perfect 5” x 1.5” but the shape and size does not seem to affect the cfm flow all that much.


The intake duct was fabricated from 16ga steel that I had lying around my garage, one 4.5” and one 3” exhaust pipe that I picked up at a local supplier, I also welded in place six 10-24 screws so I could mount the duct to the underside of the cowling. Once I welded all the seams I had limited access to the interior of the duct so I used Eastwood’s Internal Frame coating (p/n: 12511Z) to coat the interior of the duct to prevent any rust from forming on the inside. The outside was primed and painted using Eastwood’s Extreme Chassis Black Satin (p/n: 11175Z)
As you can see in the photos I also had to modify the HVAC cover to allow clearance for the intake duct to sit just above it and minimize flow restriction into the HVAC intake, it was just a matter of cutting away some portions of the plastic cover and laying on some fiberglass to the shape I wanted. It’s a close fit but it works quite well.
The intake duct is held in place using the six 10-24 screws and some #10 flat washers and #10 acorn nuts. The HUMVEE cap is held in place using three #10 security screws. I opted for the security screws to prevent anyone from tying to borrow the cap. Once everything was mounted in place it was just a matter of attaching the 3” tube from the intake duct to the 3” mounting flange that comes with the Spectra Performance kit, replacing the cowling and buttoning everything up.


All in all it took several hours over a couple of weekends to fabricate, fit and mount everything but I think it was well worth the effort. Your comments are welcomed.
Last edited by a moderator:
